DIY Projects & Crafts with Fasteners
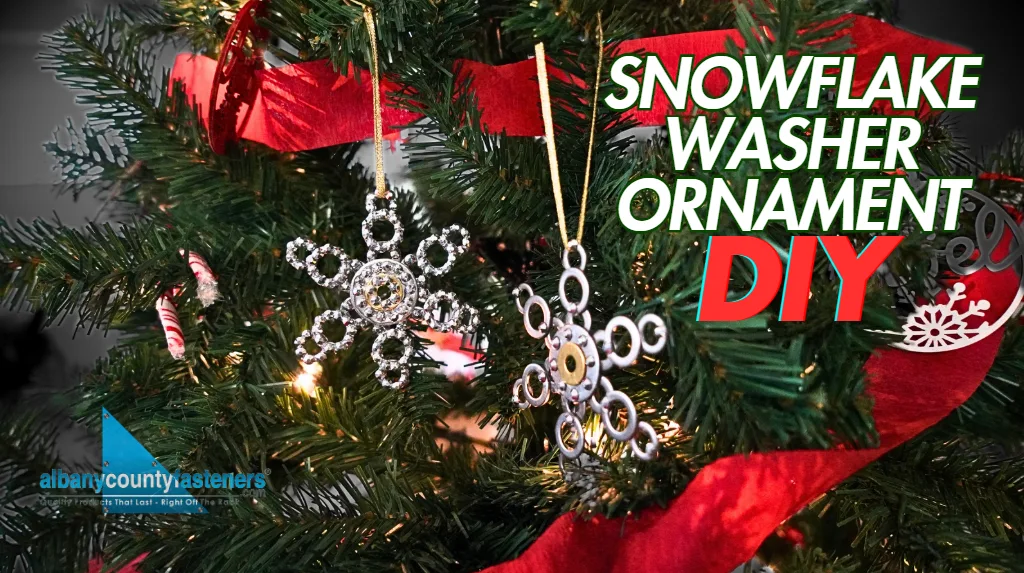
DIY Crystal Washer Snowflake Ornament
Watch How It's Made
Printable Instructions
Download PDF
DIY Crystal Washer Snowflake Ornament
Safety First!
- Adult supervision required for using glue and adhesives
- Keep small parts away from children under 3
- Work in a well-ventilated area
- Wear gloves when handling glue
Materials Needed
Washers:
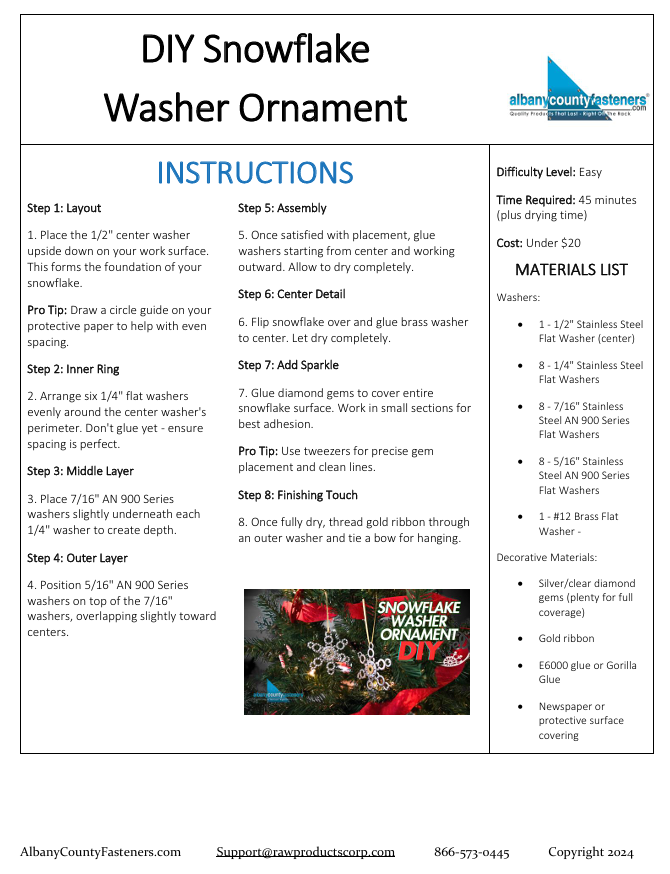
- 1 - 1/2" Stainless Steel Flat Washer (center) - ACF SKU 1000-105182
- 8 - 1/4" Stainless Steel Flat Washers - ACF SKU 1000-105142
- 8 - 7/16" Stainless Steel AN 900 Series Flat Washers - ACF SKU 1000-105172
- 8 - 5/16" Stainless Steel AN 900 Series Flat Washers - ACF SKU 1000-105152
- 1 - #12 Brass Flat Washer - ACF SKU 4000102
Decorative Materials:
- Silver/clear diamond gems (plenty for full coverage)
- Gold ribbon
- E6000 glue or Gorilla Glue
- Newspaper or protective surface covering
Step-by-Step Instructions
Step 1: Layout
Place the 1/2" center washer upside down on your work surface. This forms the foundation of your snowflake.
Pro Tip: Draw a circle guide on your protective paper to help with even spacing.
Step 2: Inner Ring
Arrange six 1/4" flat washers evenly around the center washer's perimeter. Don't glue yet - ensure spacing is perfect.
Step 3: Middle Layer
Place 7/16" AN 900 Series washers slightly underneath each 1/4" washer to create depth.
Step 4: Outer Layer
Position 5/16" AN 900 Series washers on top of the 7/16" washers, overlapping slightly toward centers.
Step 5: Assembly
Once satisfied with placement, glue washers starting from center and working outward. Allow to dry completely.
Step 6: Center Detail
Flip snowflake over and glue brass washer to center. Let dry completely.
Step 7: Add Sparkle
Glue diamond gems to cover entire snowflake surface. Work in small sections for best adhesion.
Pro Tip: Use tweezers for precise gem placement and clean lines.
Step 8: Finishing Touch
Once fully dry, thread gold ribbon through an outer washer and tie a bow for hanging.
Creative Variations
Color Themes:
- Use all clear gems for an ice crystal effect
- Use blue and clear gems for a winter theme
- Use gold and silver for an elegant look
- Color-matching gems to your holiday decor
Bedazzling Patterns:
- Full coverage for maximum sparkle
- Outline only for subtle shine
- Alternating gems and metal for contrast
- Geometric patterns within each washer
Size Variations:
- Use larger washers for a dramatic effect
- Create mini versions for package decorations
- Mix different washer sizes for unique patterns
Ribbon Options:
- Braided red and green for a traditional look
- Blue and white for a winter theme
- Silver ribbon for an elegant style
- Multiple thing ribbons twisted together
Pro Tips:
- Use a ruler to check spacing between washers
- Work on a level surface for even alignment
- Keep gems in a shallow dish for easy access
- Clean washers with alcohol before starting
- Take photos of your layout before gluing