DIY Projects & Crafts with Fasteners
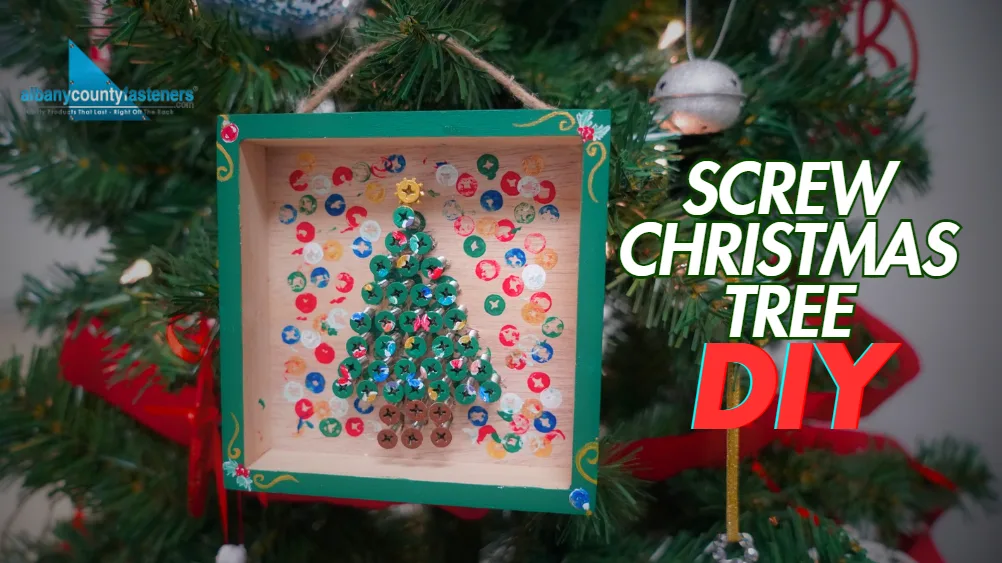
DIY Screw Christmas Tree Frame
Watch How It's Made
Printable Instructions
Safety First!
- Adult supervision required for using glue and adhesives
- Keep small parts away from children under 3
- Work in a well-ventilated area
- Wear gloves when handling glue
Materials Needed
Hardware:
- 40 - #8 x 1" Phillips flat head sheet metal screws (ACF SKU 3360032)
- 1 - #10 External Tooth Lock Washer
- 5" x 5" Wooden frame
- Screw gun or screwdriver
Paint & Supplies:
- Acrylic Paint:
- White
- Green
- Red
- Gold
- Blue
- Brown
- Paint Brushes
- E6000 Glue
Step-by-Step Instructions
Step 1: Prepare Your Frame
- Place frame on flat surface
- Find and mark center points:
- Top of tree
- Bottom center
- Two bottom widest points
Step 2: Create Tree Pattern
- Use green paint on screw head to stamp tree outline
- Work top to bottom
- Use brown paint to stamp trunk area
- Pattern guide:
- 3 screws for trunk
- 7 screws for tree base
- Decrease each row working up
- Single screw at top
Pro Tip: Practice your stamping technique on scrap wood first.
Step 3: Install Screws
Working from top down, install screws into stamped pattern. Drive slowly for precise placement and angle.
Step 4: Create Star
- Add lock washer to final screw
- Secure with glue
- Install at tree top
Step 5: Paint Details
- Paint all screwheads white first
- Paint tree green
- Paint trunk brown
- Paint star gold
- Add ornament details with white highlights
Step 6: Create Background
- Use screw heads to stamp ornament patterns around tree
- Alternate colors: red, green, white, blue, and gold
- Paint frame edges green
Pro Tip: Let each color dry completely before adding adjacent stamps.
Step 7: Add Details
Decorate frame corners with painted ornaments, holly leaves, or gold swirls
Creative Variations
- Tree Ornament:
- Add strong ribbon or twine for hanging
- Position near lights for sparkle
- Consider weight distribution on branch
- Shelf Display:
- Use small easel for angled display
- Group with other holiday decor
- Add battery-operated mini lights around frame
- Wall Mounting:
- Add sawtooth hanger or picture wire
- Create gallery wall with other holiday art
- Consider seasonal display options
Creative Tips:
- Mix metallic paint for extra sparkle
- Try different screw head styles for varied stamp patterns
- Add glitter to wet paint for shimmer
- Create multiple frames in different color schemes