DIY Projects & Crafts with Fasteners
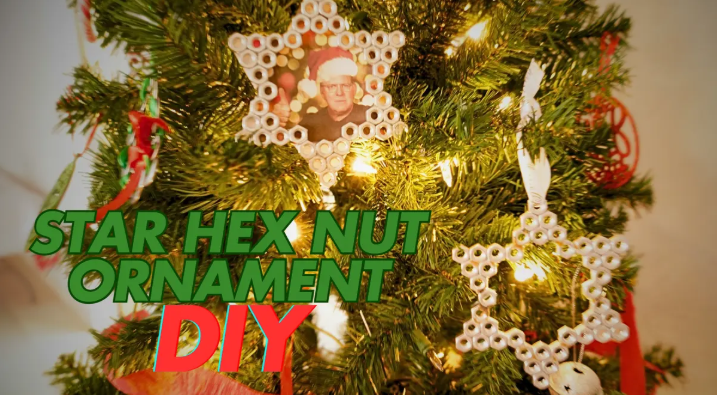
DIY Star Hex Nut Ornament
Transform ordinary hex nuts into a charming star ornament or star frame for your holiday tree!
Watch How It's Made
Printable Instructions
Download PDF
DIY Star Hex Nut Ornament Instructions
Safety First!
- Adult supervision required for glue application
- Keep small parts away from children under 3
- Work in a well-ventilated area when using strong adhesives
- Wear gloves when handling adhesives
- Adults should pre-check nuts for any sharp edges
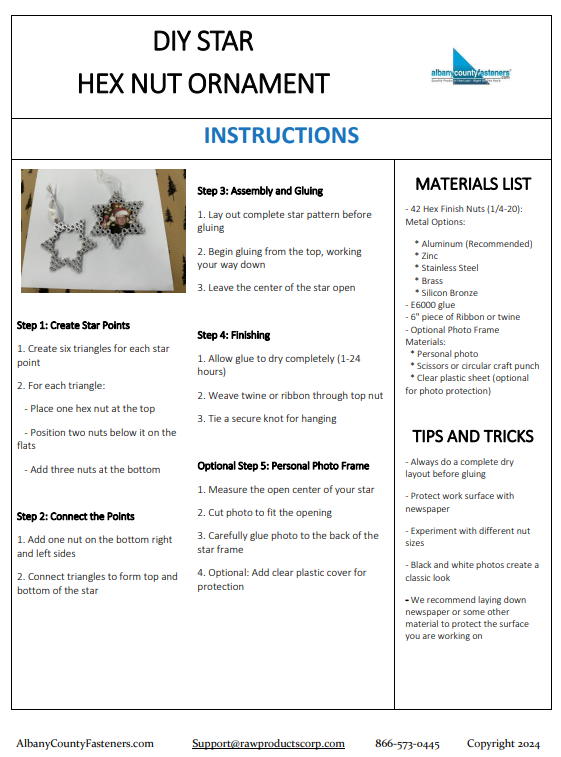
Materials Needed
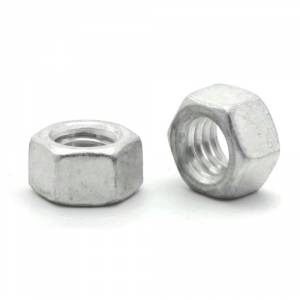
42 Hex Finish Nuts (1/4-20)
- Aluminum (Recommended) - ACF SKU 1000-110-0002
- Zinc Option - ACF SKU 1100-006-0002
- Other options: stainless steel, brass, silicon bronze
Adhesive (choose one):
- E6000 glue
- Gorilla Glue
6" piece of Twine or Ribbon
Optional Photo Frame Materials:
- Personal photo
- Scissors or circular craft punch
- Clear plastic sheet (optional for photo protection)
Step-by-Step Instructions
Step 1: Create Star Points
Start by making six triangles for each point of the star. For each triangle, arrange nuts in a pyramid pattern:
- Place one hex nut at the top
- Position two nuts below it on the flats
- Add three nuts at the bottom
Step 2: Connect the Points
Add one nut on the bottom of both right and left sides. Connect triangles on each side to form the top and bottom of the star.
Step 3: Assembly and Gluing
Once your star pattern is laid out, begin gluing each nut starting at the top and working your way down. The middle of the star will remain open.
Step 4: Finishing
After the glue has dried according to package instructions (1-24 hours), weave the twine or ribbon through the top nut and tie a secure knot.
Optional Step 5: Add a Personal Photo
Turn your star into a memorable photo frame ornament:
- Measure the open center of your star
- Cut your chosen photo in a circular or star shape to fit the opening
- Carefully glue the photo to the back of the star frame
- For protection, consider adding a clear plastic cover over the photo
Pro Tip: Use a photo of family members, pets, or special holiday moments. Black and white photos can create a classic look that complements the metallic finish of the nuts.
Optional Photo Frame Addition
Creative Variations
Pattern Layout: Always lay out the complete pattern before gluing
Surface Protection: Protect your work surface with newspaper
Size Variations: Experiment with different nut sizes for varied star sizes
Ribbon Options:
- Braided red and green for traditional holiday look
- Blue and white for winter theme
- Match ribbon to your nut material
Photo Selection:
- Choose photos with centered subjects for best display
- Consider using holiday-themed photos
- Print extra copies of photos in case of cutting mistakes
- Size photos slightly larger than opening for overlap when gluing