DIY Projects & Crafts with Fasteners
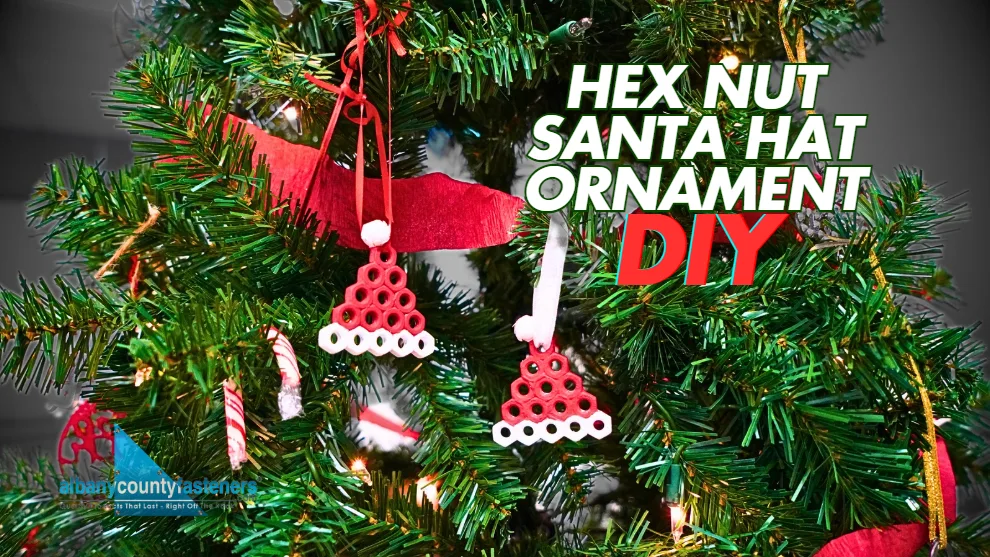
DIY Hex Nut Santa Hat Ornament
Watch How It's Made
Printable Instructions
Safety First!
- Adult supervision required for using glue and adhesives
- Keep small parts away from children under 3
- Work in a well-ventilated area
- Wear gloves when handling glue
Materials Needed
Hardware:
- 1 - 1/2" Stainless Steel Flat Washer (center) - ACF SKU 1000-105182
- 8 - 1/4" Stainless Steel Flat Washers - ACF SKU 1000-105142
- 8 - 7/16" Stainless Steel AN 900 Series Flat Washers - ACF SKU 1000-105172
- 8 - 5/16" Stainless Steel AN 900 Series Flat Washers - ACF SKU 1000-105152
- 1 - #12 Brass Flat Washer - ACF SKU 4000102
Paint & Decorative Materials:
- Red acrylic paint
- White acrylic paint
- White glitter
- Ribbon of your choice
Tools:
- Paint brushes
- Scissors
- E6000 glue
- Protected work surface
Step-by-Step Instructions
Step 1: Arrange Your Hat Shape
Create a pyramid shape with your hex nuts:
- Bottom row: 5 nuts
- Second row: 4 nuts
- Third row: 3 nuts
- Fourth row: 2 nuts
- Top: 1 nut
- Place cap nut tilted against the top hex nut's flat side
Pro Tip: Use a ruler to ensure your rows are centered and aligned properly.
Step 2: Assembly
Once you're happy with the arrangement, carefully glue each nut in place, working from bottom to top. Ensure the cap nut is securely attached at its tilted angle.
Step 3: Base Coat
Apply 2-3 coats of white paint to all components, including both sides. Let each coat dry completely.
Pro Tip: Light, even coats will provide better coverage than one thick coat.
Step 4: Add Holiday Colors
Paint the upper portion red (rows of 4, 3, 2, and 1 nuts), leaving the bottom row and cap nut white. Apply 2-3 coats for even coverage. Paint both sides.
Step 5: Add Sparkle
Once all paint is dry, add one final coat of white to the cap nut and immediately cover or dip it in white glitter. Let dry completely.
Step 6: Finishing Touch
Thread your chosen ribbon through the top hex nut and tie securely for hanging.
Creative Variations
Color Options:
- Traditional: Red hat with white trim
- Modern: Silver hat with white trim
- Whimsical: Pink hat with white trim
- Elegant: Gold hat with crystal glitter
Additional Decorations:
- Add tiny jingle bells
- Attach mini ornaments
- Use different glitter colors
- Add rhinestone accents
Ribbon Options:
- Red satin for a classic look
- White organza for a snowy effect
- Gold metalic for an elegant touch
- Plaid for rustic charm
Pro Tips:
- Paint in a well ventilated area
- Use a spare box lid to contain glitter
- Keep nuts in place while gluing by working on a level surface
- Create multiple hats at once while paint is out
- Clean nuts with rubbing alcohol before painting for better adhesion